前言
@Async注解为spring提供的一个公共线程池,需要配合@EnableAsync注解开启。
使用@Async注解的方法称之为异步方法,相当于为该方法开了一个新的线程,使其在不影响主线程的前提下运行。
简单使用
使用@EnableAsync配置异步功能
1
2
3
4
5
6
7
8
9
| import org.springframework.context.annotation.Configuration;
import org.springframework.scheduling.annotation.EnableAsync;
@Configuration
@EnableAsync
public class AsyncConfig {
}
|
服务层:
1
2
3
4
5
6
7
8
9
10
11
12
13
14
15
16
17
18
19
20
21
22
23
24
25
26
27
28
29
30
31
32
33
34
35
36
37
38
39
40
41
42
43
44
45
46
| import org.slf4j.Logger;
import org.slf4j.LoggerFactory;
import org.springframework.scheduling.annotation.Async;
import org.springframework.stereotype.Service;
@Service
public class AsyncTestService {
private static final Logger logger = LoggerFactory.getLogger(AsyncTestService.class);
@Async
public void method2() throws InterruptedException {
logger.info("---------method2开始--------------");
Thread.sleep(3000);
logger.info("---------end2--------------");
}
@Async
public void method3() throws InterruptedException {
logger.info("---------method3开始--------------");
Thread.sleep(3000);
logger.info("---------end3--------------");
}
public void method1() throws InterruptedException {
logger.info("---------------------非异步方法开始-------------------");
Thread.sleep(7777);
logger.info("----------------------非异步方法开始结束--------------------");
}
}
|
测试:
1
2
3
4
5
6
7
8
9
10
11
12
13
14
15
16
17
18
19
20
21
22
23
24
25
26
27
28
29
30
|
import com.example.demo.service.AsyncTestService;
import org.slf4j.Logger;
import org.slf4j.LoggerFactory;
import org.springframework.beans.factory.annotation.Autowired;
import org.springframework.web.bind.annotation.RequestMapping;
import org.springframework.web.bind.annotation.ResponseBody;
import org.springframework.web.bind.annotation.RestController;

@RestController
public class WebController {

    private static final Logger logger = LoggerFactory.getLogger(WebController.class);

    @Autowired
    AsyncTestService asyncTestService;


    @RequestMapping("ahzoo")
    @ResponseBody
    public void toTest() throws InterruptedException {
        logger.info("----------主线程开始------------");
        long start = System.currentTimeMillis();
        asyncTestService.method1();
        asyncTestService.method2();
        asyncTestService.method3();
        Thread.sleep(3000);
        logger.info("--------------主线程结束,执行用时:" + (System.currentTimeMillis() - start) + "-------------ahzoo.cn------------------");
    }
}
|
注意观察日志打印时间,可以看到主线程的非异步方法先执行完毕,然后主线程中的其他异步方法在不影响主线程的前提下开始执行。最终主线程的用时约等于自身的3秒加非异步方法的7秒多。

自定义
多数情况下,@Async注解的默认配置就已经足够。
自定义线程池
除了使用@Async提供的默认线程池外,我们还可以使用自定义线程池(推荐使用spring提供的线程池:ThreadPoolTaskExecutor),然后指定使用的线程池即可:@Async("自定义的线程池名").
示例:
1
2
3
4
5
6
7
8
9
10
11
12
13
14
15
16
17
18
19
20
21
22
23
24
25
26
27
28
29
30
31
32
33
34
35
36
37
38
39
| import org.springframework.context.annotation.Bean;
import org.springframework.context.annotation.Configuration;
import org.springframework.scheduling.annotation.EnableAsync;
import org.springframework.scheduling.concurrent.ThreadPoolTaskExecutor;
import java.util.concurrent.Executor;
import java.util.concurrent.ThreadPoolExecutor;
@Configuration
@EnableAsync
public class AsyncExecutorConfigurer {
private static final Integer CORE_POOL_SIZE = 3;
private static final Integer MAX_POOL_SIZE = 9;
private static final Integer QUEUE_CAPACITY = 90;
private static final Integer KEEP_ALIVE_TIME = 1000;
private static final String THREAD_NAME = "Ahzoo-";
@Bean
public Executor getCustomizeAsyncExecutor() {
ThreadPoolTaskExecutor executor = new ThreadPoolTaskExecutor();
executor.setCorePoolSize(CORE_POOL_SIZE);
executor.setMaxPoolSize(MAX_POOL_SIZE);
executor.setQueueCapacity(QUEUE_CAPACITY);
executor.setThreadNamePrefix(THREAD_NAME);
executor.setKeepAliveSeconds(KEEP_ALIVE_TIME);
executor.setRejectedExecutionHandler(new ThreadPoolExecutor.CallerRunsPolicy());
executor.initialize();
return executor;
}
}
|
使用:
服务层:
1
2
3
4
5
6
7
8
9
10
11
12
13
14
15
16
17
18
19
20
21
22
23
24
25
26
27
28
29
30
31
32
33
34
35
36
37
38
39
40
41
42
43
44
45
46
47
48
49
50
51
52
53
54
55
56
57
58
59
60
61
62
63
64
65
66
67
68
69
| import org.slf4j.Logger;
import org.slf4j.LoggerFactory;
import org.springframework.scheduling.annotation.Async;
import org.springframework.stereotype.Service;
@Service
public class AsyncTestService {
private static final Logger logger = LoggerFactory.getLogger(AsyncTestService.class);
@Async
public void method2() throws InterruptedException {
logger.info("---------method2开始--------------");
Thread.sleep(3000);
logger.info("---------end2--------------");
}
@Async
public void method3() throws InterruptedException {
logger.info("---------method3开始--------------");
Thread.sleep(3000);
logger.info("---------end3--------------");
}
@Async("getCustomizeAsyncExecutor")
public void method4() throws InterruptedException{
logger.info("---------method4开始--------------");
Thread.sleep(7000);
logger.info("---------end4--------------");
}
@Async("getCustomizeAsyncExecutor")
public void method5() throws InterruptedException{
logger.info("---------method5开始--------------");
Thread.sleep(9000);
logger.info("---------end5--------------");
}
public void method1() throws InterruptedException {
logger.info("---------------------非异步方法开始-------------------");
Thread.sleep(7777);
logger.info("----------------------非异步方法开始结束--------------------");
}
}
|
测试:
1
2
3
4
5
6
7
8
9
10
11
12
13
14
15
16
17
18
19
20
21
22
23
24
25
26
27
28
29
30
31
32
33
|
import com.example.demo.service.AsyncTestService;
import org.slf4j.Logger;
import org.slf4j.LoggerFactory;
import org.springframework.beans.factory.annotation.Autowired;
import org.springframework.web.bind.annotation.RequestMapping;
import org.springframework.web.bind.annotation.ResponseBody;
import org.springframework.web.bind.annotation.RestController;

@RestController
public class WebController {

    private static final Logger logger = LoggerFactory.getLogger(WebController.class);

    @Autowired
    AsyncTestService asyncTestService;

    @RequestMapping("ahzoo")
    @ResponseBody
    public void toTest() throws InterruptedException {
        logger.info("----------主线程开始------------");
        long start = System.currentTimeMillis();
        asyncTestService.method1();
        asyncTestService.method2();
        asyncTestService.method3();
        asyncTestService.method4();
        asyncTestService.method5();
        Thread.sleep(3000);
        logger.info("--------------主线程结束,执行用时:" + (System.currentTimeMillis() - start) + "-------------ahzoo.cn------------------");
    }

}
|
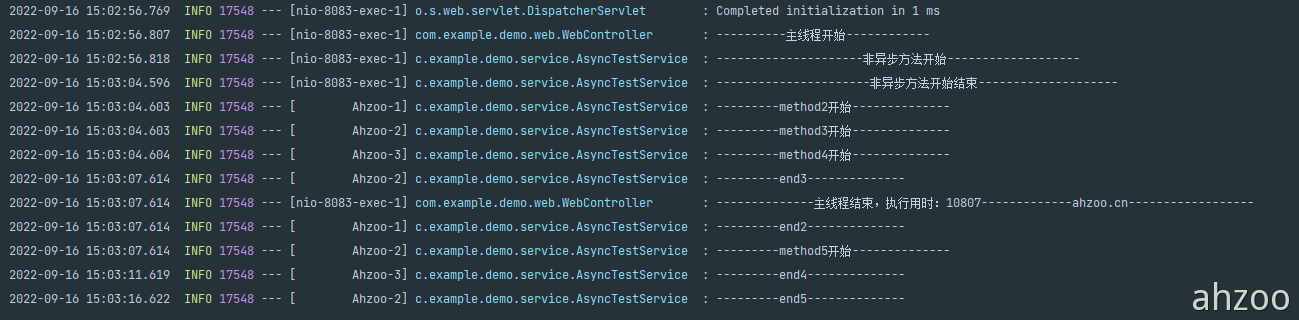
同样注意观察日志打印时间,可以看到除了非异步方法,各个异步方法之间都是独立异步执行,且不影响主线程。
同时,由于只配置了三个线程池,所以第四个使用@Async注解的方法并没有立即执行。
重写配置
打开@Async注解的配置接口AsyncConfigurer。
1
2
3
4
5
6
7
8
9
10
11
12
13
14
15
16
17
18
19
20
21
| public interface AsyncConfigurer {
@Nullable
default Executor getAsyncExecutor() {
return null;
}
@Nullable
default AsyncUncaughtExceptionHandler getAsyncUncaughtExceptionHandler() {
return null;
}
}
|
如果自定义配置的话,就实现AsyncConfigurer类,然后重写方法即可。
线程池的创建方式可以参照上面自定义中的线程池创建方式。
使用方式就是默认的使用方式,直接使用@Async注解即可。
Async/EnableAsync注解异步方法的使用
 微信
微信 支付宝
支付宝